Grooming your dog at home can deliver professional results when you use the right tools and techniques; this guide to diy dog grooming tips helps you save $600+ annually while keeping your pet safe. You’ll learn necessary tools for every coat type, nail-trimming hacks, bathing frequency, how to handle matted fur (which can hide infection), and when to hire a pro to avoid risks like cutting the quick. Follow practical, safety-first steps to make grooming efficient and stress-free.
Key Takeaways:
- Using necessary grooming tools and coat-type techniques, diy dog grooming tips let you achieve professional-quality results at home and can cut grooming costs by $600+ per year.
- Follow actionable steps for bathing frequency, safe nail trimming, and matted-fur removal to protect your dog’s skin and coat while avoiding common mistakes that lead to stress or injury.
- Know breed-specific needs and set clear limits—DIY works for routine maintenance, but seek a professional for complex cuts, severe matting, or behavioral and safety concerns.
Understanding Your Dog’s Grooming Needs
Importance of Regular Grooming
Regular grooming keeps your dog healthy and comfortable: you prevent matted fur, reduce excess shedding, and spot skin infections or parasites early. You’ll cut long-term costs—many owners save over $600 annually by doing routine care at home—and lower the risk of painful nail overgrowth and ear infections. Consistent attention also reinforces training and trust, making grooming less stressful for both of you.
Factors Affecting Grooming Frequency
Grooming needs vary widely by coat and lifestyle: a long, silky coat often requires daily brushing and trims every 4–8 weeks, while short-haired breeds usually do well with weekly brushing and baths every 6–12 weeks. You should factor in activity level, skin conditions, and age when planning your diy dog grooming tips.
- Coat type: short, long, curly, double-coated
- Activity level: indoor companion vs. outdoor worker
- Age & health: puppies and seniors need gentler, more frequent checks
- Breed standards: breed-specific trims and styles
- Lifestyle: swimming, hiking, or city life affects dirt and mats
- Recognizing seasonal shedding and lifestyle changes helps you set a realistic grooming schedule.
Digging deeper, double-coated breeds (e.g., Siberian Husky) shed heavily in spring/fall and benefit from 2–3 brushings per week plus deshedding during blowouts; long-coated breeds (e.g., Shih Tzu) need daily brushing to avoid mats and professional trims every 4–6 weeks if you keep a show clip. For nails, most dogs need trimming every 2–4 weeks; active dogs may wear down nails naturally less often. Watch for hot spots, odor, or excessive scratching—these are signs to increase care or consult your vet.
- Double-coated: frequent brushing, avoid full shave
- Long, silky: daily detangling, professional trims every 4–8 weeks
- Short-haired: weekly brushing, less frequent baths
- Active/outdoor: check paws and ears after outings
- Recognizing specific breed and lifestyle cues prevents over- or under-grooming.
Seasonal Considerations
Season affects coat care: many dogs double their shedding in spring and fall, so you’ll increase brushing and use a de-shedding tool to reduce loose hair. In summer, you might bathe more after swims and trim paw hair for heat relief; in winter, you’ll protect skin with moisturizing shampoos and avoid shaving double coats to prevent sunburn and insulation loss.
Specifically, plan for biannual blowouts during peak shed to remove undercoat efficiently and cut indoor hair by up to 80–90% between sessions with proper tools. During tick season, add weekly tick checks and consider shorter trims around the neck and belly to spot pests faster. For cold climates, keep coat length that preserves insulation and use paw balms to prevent cracking from ice and salt; for hot climates, clip long hair conservatively and prioritize cooling strategies over full shaving.
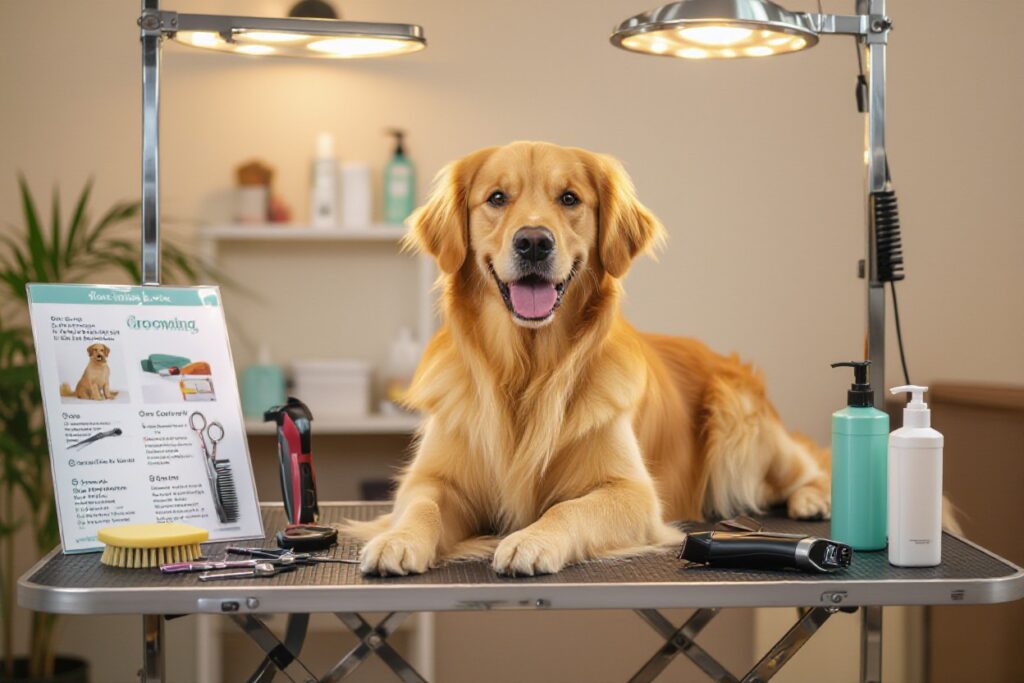
Essential Tool Kit
Must-Have Grooming Tools
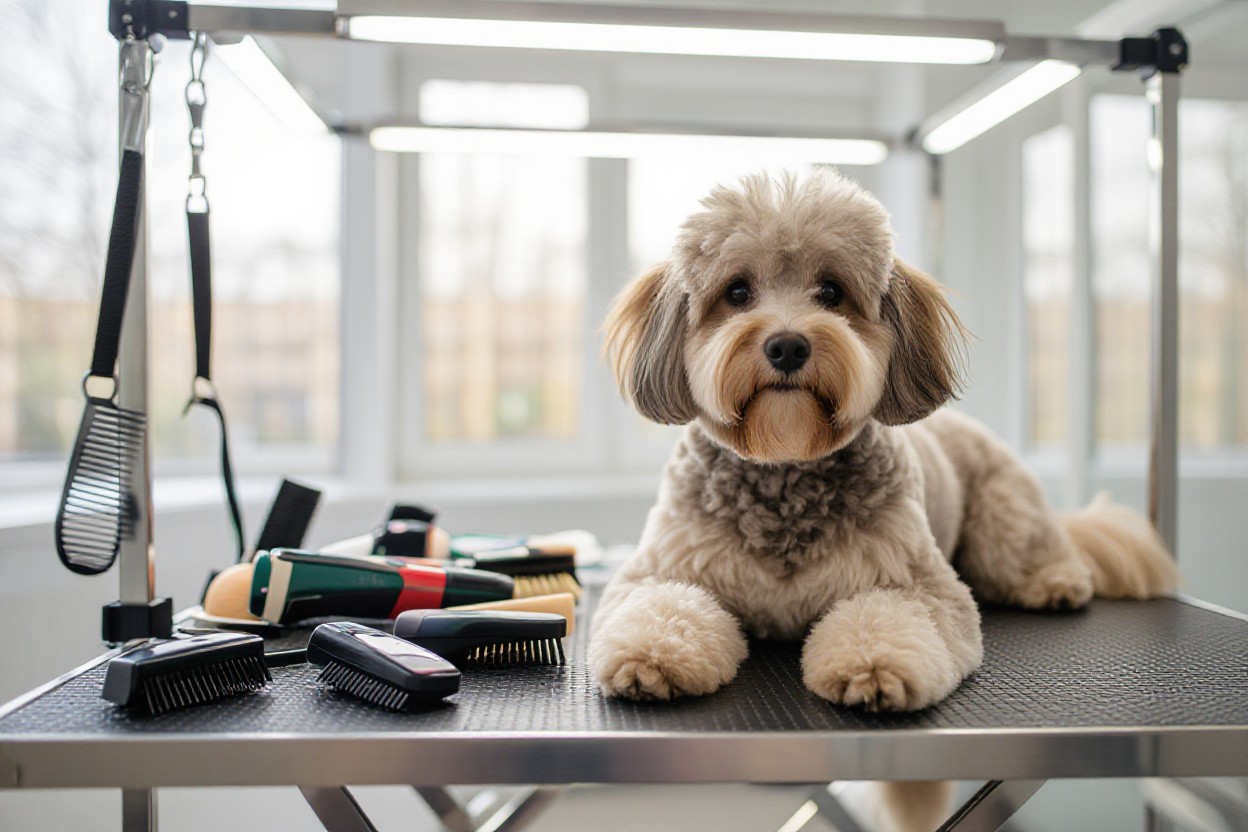
Stock a slicker brush, undercoat rake, pin brush, stainless steel comb, dematting tool, quality clippers with at least three blade sizes, and manual or guillotine nail trimmers; keep styptic powder handy in case you cut the quick. You’ll also want cotton balls, ear cleaner, and a non-slip mat for safe handling.
Additional Tools for Specialized Grooming
For breed-specific looks, add thinning shears, curved grooming scissors, a grooming arm/table, a high-velocity dryer, and breed blades (e.g., #10, #7F); use blunt-tip scissors near the face to prevent injury and note that a high-velocity dryer can cut drying time by up to 50% on double coats.
For double-coated breeds like German Shepherds or Huskies, pair an undercoat rake with a high-velocity dryer and a de-shedding tool; for curly breeds such as Poodles and Bichons, use clipper blades #10–#4 for body work and thinning shears for scissoring. Keep spare blades and blade oil on hand, and plan to sharpen or replace blades every 6–12 months depending on use. Maintain a small first-aid kit and a spare set of grooming scissors to avoid rushing during trims.
Selecting Quality Equipment
Prioritize clippers with detachable blades, low-vibration motors, and good battery life (60–120 minutes); expect to pay $100–$250 for reliable cordless clippers and $10–$40 for quality brushes. Investing well is one of the best diy dog grooming tips because it helps you save $600+ annually compared with salon visits.
Choose proven brands (Andis, Wahl, Oster) with ceramic or steel detachable blades, adjustable speeds, and a warranty. Look for clippers with sufficient torque for thick coats, at least 60 minutes runtime, and a cool-running motor—cheap units often overheat and can burn your dog’s skin. Read user reviews, check for replaceable batteries, and factor in consumables: blades and oils typically add $30–$80 per year. A quality clipper paid once can pay for itself in a few months of DIY grooming.
Preparing for Grooming
Setting Up Your Grooming Space
Choose a well-lit, ventilated area with an easy-to-clean floor and a non-slip surface for baths and trimming; place a sturdy table or low platform for medium/large dogs and keep a towel, waste bin, and leash/tether within arm’s reach. Position yourself so you can reach all sides without stretching, keep noise low, and set a 20–30 minute timer for focused sessions to prevent rushed mistakes—avoid elevated surfaces without a secure harness to prevent falls and injury.
Gathering Necessary Supplies
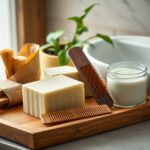
Build a compact kit: slicker brush, undercoat rake, stainless steel comb, dematting tool, quality clippers with spare blades, curved grooming scissors, nail clippers or grinder, styptic powder, dog-formulated shampoo and conditioner, towels, treats, ear-cleaner, toothbrush, and a basic first-aid kit; store everything in a caddy so you can move between bath, tub, and yard. Prioritize cool-running clippers and a styptic for safety.
Expect to invest about $100–$300 up front for mid-range tools—clippers $40–$150, brushes $10–$30—yet you can save $600+ annually by DIY grooming. For coat-specific gear: use a #10 or #7F blade for close trims on poodles, a de-shedding tool for double coats like Huskies, and a mat splitter or dematting comb for long-haired breeds. Sanitize metal tools with 70% isopropyl alcohol between uses, replace blades when they heat up or pull, and keep a blade oil on hand to extend life and prevent burns.
Easing Your Dog Into Grooming
Start slow with 5–10 minute sessions, rewarding calm behavior with high-value treats and breaks; run tools nearby before touching to desensitize to sound, and touch paws, ears, and tail in short, positive increments so your dog associates grooming with treats and play. Limit sessions to no more than three short attempts per day during training phases, and never force a stressed dog—stop if you see frantic panting, trembling, or escape attempts.
Use a staged plan: Week 1 focus on handling (paws, ears, mouth) for 3–5 minutes daily; Week 2 add brushing and towel handling; Week 3 introduce clippers off, then briefly on, increasing by 30–60 seconds each session. Pair every new step with a treat-to-time ratio (one small treat per successful minute) and consider tools like a Thundershirt or pheromone diffuser for anxious dogs; consult your vet before sedatives—if biting or extreme fear persists, schedule a professional session or behaviorist consult to avoid injury.
Bathing Techniques
Choosing the Right Shampoo
Match shampoo to coat and skin: use a gentle, dog-formulated shampoo with a dog-skin pH (about 6.2–7.4). For itchy or flaky skin choose oatmeal or chlorhexidine/ketoconazole medicated formulas per vet guidance; for flea control use products recommended by your vet. Avoid human shampoos, sulfates and heavy fragrances. Dilute concentrated formulas per label (common ratios 1:4–1:10) to improve spread and rinseability—this is one easy win in your diy dog grooming tips.
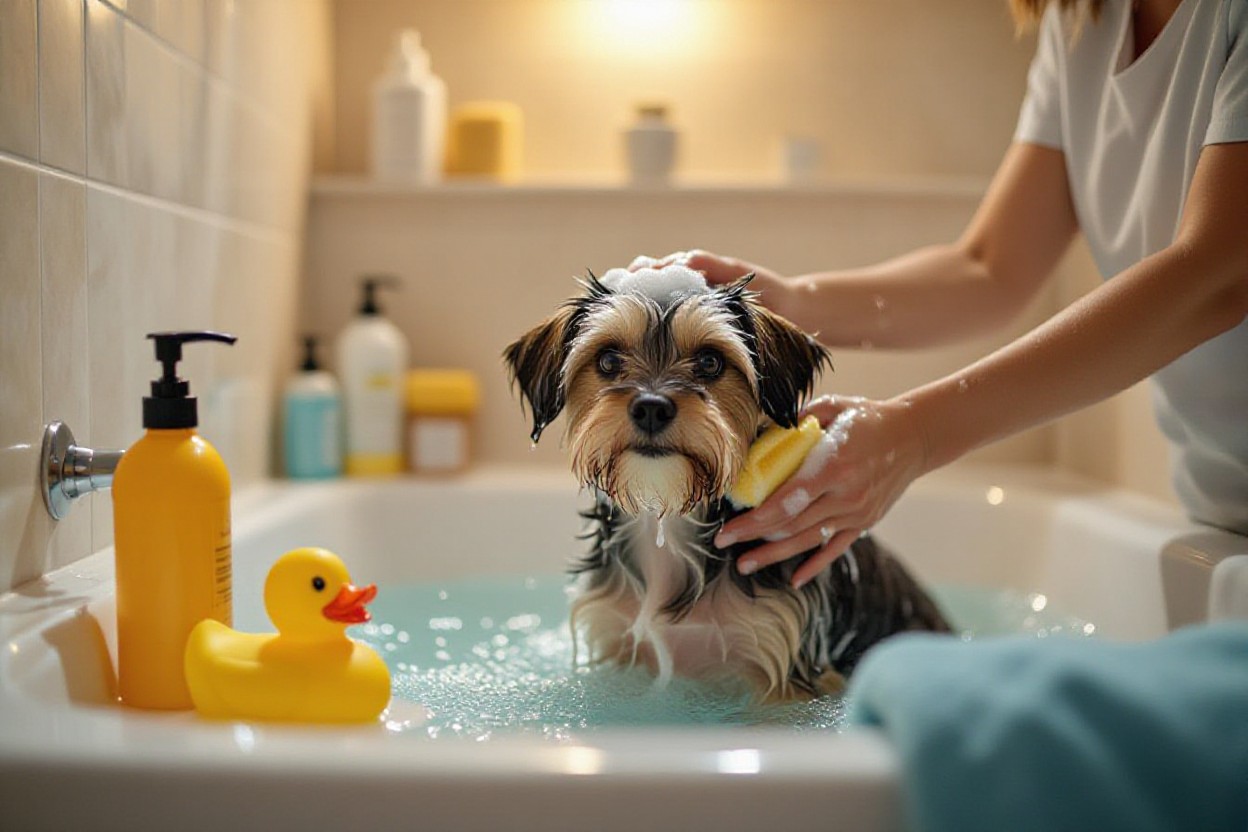
Proper Bathing Method
Brush thoroughly before bathing to remove mats, then place your dog on a non-slip surface and use lukewarm water (about 37°C / 98°F). Wet from neck to tail, apply shampoo sparingly, lather gently for 2–3 minutes, and rinse until water runs clear to avoid residue. Protect ears with cotton (don’t push deep) and avoid the eyes and muzzle. Use a handheld sprayer or cup for even rinsing and a towel nearby to reduce slipping.
Adjust technique by coat type: for double-coated breeds rinse extra long to remove loose undercoat and never shave the undercoat except on vet advice; long-haired dogs benefit from a conditioner or detangler (apply mid-lengths to ends), and short-coated dogs often need only light conditioning. Bath frequency varies—generally every 4–8 weeks depending on activity and skin condition—so track skin reactions and consult your vet for persistent irritation or infections.
Drying Your Dog Effectively
Start with a microfiber towel to blot excess water, then use a second dry towel to rub gently. For most dogs a low-heat hair dryer or a pet-specific high-velocity dryer works well; keep the dryer 30–45 cm from the coat and use low heat/low noise settings. Avoid high heat and aim to keep your dog calm with treats or a helper to minimize stress and shaking.
While blow-drying, brush in the direction of hair growth to prevent tangles—use a slicker or pin brush for long coats and a de-shedding tool for double coats. Small breeds often dry in 10–30 minutes; medium to large double-coated breeds can take 1–3 hours to reach a fully dry undercoat. Ensure you fully dry dense coats to prevent skin infections or mildew and check the skin as you dry for hotspots, fleas or unusual lumps.
Brushing and De-Shedding
Best Brushes for Different Coat Types
Short coats do best with a bristle or rubber brush, while double coats need an undercoat rake to remove loose underfur; long, silky coats benefit from a pin brush and a slicker for tangles, and curly or corded coats require a wide-tooth comb and slicker for gentle shaping. Use patience and light strokes, and avoid pulling mats to prevent skin tears. Perceiving the correct brush for each section reduces matting and skin irritation.
- diy dog grooming tips
- brushing
- de-shedding
| Coat Type | Recommended Brush |
|---|---|
| Short | Bristle or rubber curry |
| Double (e.g., Labrador) | Undercoat rake + slicker |
| Long (e.g., Afghan) | Pin brush + wide-tooth comb |
| Curly (e.g., Poodle) | Slicker + detangling comb |
| Wire (e.g., Terrier) | Stripping comb or slicker |
Techniques for Effective Brushing
Start by dividing the coat into sections and brush from the skin outward to lift loose hair; you should use short, gentle strokes and angle the brush to follow hair growth. Apply treats for calm compliance, and spend 10–20 minutes per session for medium-to-large dogs to significantly cut shedding. Check for skin lesions as you go to avoid aggravating infections.
You can schedule heavy grooming: for heavy shedders brush daily or every other day and use undercoat tools weekly, while low-shed breeds need 2–3 sessions weekly. Work methodically—neck, shoulders, sides, belly, then legs—so you don’t miss mats; in one household case study, a weekly 15-minute routine reduced visible shedding by about 40% within six weeks.
De-Shedding Tools and Their Usage
Use an undercoat rake to pull trapped fur, a de-shedding blade (or branded tool) for loose undercoat, and a grooming glove for light maintenance and bonding. Start gently and test a small area to gauge comfort; excessive force can irritate the skin, so stop if your dog shows discomfort. Overuse can thin the coat if you’re not careful.
For best results, use de-shedding tools on dry, brushed coats and work in the direction of hair growth with 5–10 passes per area; combine with a weekly bath schedule to loosen trapped hair. You’ll save time and money—often over $600 annually versus frequent professional trims—while keeping your home hair-free, but limit intense de-shedding to once weekly on most breeds to protect the coat’s insulating layer.
Nail Care
Understanding Nail Anatomy
You need to know the nail has a hard outer shell and a living center called the quick, which contains blood and nerves; in light nails the quick is pink and visible, in dark nails it’s hidden. Trim frequency is typically every 3–4 weeks; if nails touch the floor your dog may need trimming more often. Cutting into the quick causes pain and bleeding, so you should cut small amounts and stop when you see a darker, hollow center forming.
Safe Nail Trimming Techniques
Work in short sessions with your dog calm and supported; hold the paw firmly, angle the clipper at about 45° following the nail’s curve, and remove only the tip in 1–2 mm increments for dark nails. Use sharp, breed-appropriate clippers or a grinder, have styptic powder on hand, and reward your dog after each paw to build positive association—this reduces stress and makes trims faster over time.
Choose the right tool: scissor or guillotine clippers for large nails, small trimmers for toy breeds, and a rotary grinder to smooth edges. Trim when your dog is relaxed—after a walk or play—so muscle tension is low; aim for a steady rhythm of trimming every 3–4 weeks, or sooner for fast-growing nails. If you nick the quick, apply styptic powder or cornstarch and hold pressure for 1–2 minutes. For anxious dogs, split the session across days and pair handling with high-value treats; many owners see full tolerance after 3–5 short sessions.
Alternatives to Nail Clips
You can use a rotary grinder (Dremel) to file nails, a coarse file for small dogs, or increase hard-surface walks to naturally wear nails down; grinders reduce the risk of cutting the quick but require steady hands and 5–15 seconds per nail. Professional trims remain an option if you’re uncomfortable, and combining methods often gives the best results for brittle or dark nails.
Grinders let you shape and smooth nails gradually—move the tool side-to-side and avoid holding it in one spot to prevent heat build-up; test after 5–10 seconds per nail and pause. If your dog walks regularly on pavement, you may cut trimming frequency by up to 50%, though this varies by breed and activity. For tiny or nervous dogs, a coarse emery board works at home; for fast-growing nails or medical concerns, schedule a pro trim every 6–12 weeks.
Ear Care
Signs of Ear Problems
Watch for frequent head shaking, persistent pawing at an ear, or a strong foul odor; those are common early signs. You may spot redness, swelling, or dark yellow/green discharge—any bleeding, severe pain, or sudden hearing loss demands immediate veterinary attention. Mild wax buildup can be normal, but if your dog tilts its head or shows balance issues, treat it as potentially serious and act quickly.
Cleaning Techniques for Dog Ears
Use a vet-approved ear cleaner, hold the ear flap up, apply a few drops into the canal, then gently massage the base for about 20–30 seconds; let your dog shake and wipe the excess with a cotton ball—never insert cotton swabs deep into the ear. For most dogs clean every 1–2 weeks, but do it weekly for swimmers and floppy-eared breeds.
Gather supplies: ear cleaner, cotton balls, treats, and a towel. First, restrain calmly and reward to keep stress low. Squeeze enough cleaner to fill the entrance (usually a few drops to a teaspoon depending on size), then massage the ear base for 20–30 seconds (roughly 8–12 firm strokes) so debris loosens. Allow your dog to shake—this expels material—then wipe the outer canal and flap with a cotton ball; repeat until wipes come away clean. Avoid alcohol, hydrogen peroxide, and anything that stings. If you see thick yellow/green pus, blood, or intense pain, stop and contact your vet immediately. For hairy breeds like Maltese or Poodles, consult about professional plucking—do not attempt aggressive hair removal without guidance.
Preventing Ear Infections
Dry ears within 30 minutes after swimming or bathing, trim excess hair around the ear opening, and check ears visually once a week for odor or discharge. Maintain regular cleanings tailored to ear type—weekly for floppy or hairy ears, monthly for typical upright ears—and manage allergies or skin conditions that often trigger infections.
Set a prevention schedule: clean after water exposure (within 24–48 hours), inspect weekly, and keep grooming consistent—trimming surrounding hair and treating dermatitis or food/environmental allergies reduces recurrence. Use drying solutions after swims for dogs prone to moisture retention. Financially, preventing one infection can save you roughly $150–$350 in vet bills and medication; clinically, it also limits the risk of chronic changes like thickened canals that require advanced care. If infections recur despite good home care, pursue allergy testing or a professional ear exam to identify underlying causes.
Teeth Care
Importance of Dental Hygiene
Dental disease affects about 80% of dogs by age three; you can prevent pain, tooth loss, and systemic infections by caring for your dog’s mouth. Bad breath, bleeding gums, or reluctance to chew signal problems, and untreated periodontal disease can allow bacteria to enter the bloodstream and impact the heart, liver, or kidneys. Daily attention to your dog’s teeth is one of the highest-impact diy dog grooming tips you can adopt to protect both health and savings.
Tools and Products for Teeth Brushing
Use a soft-bristled dog toothbrush or finger brush sized for your breed, paired with an enzymatic, dog-safe toothpaste (never use human toothpaste with xylitol). You can supplement brushing with VOHC-approved dental chews, water additives, and dental wipes for hard-to-reach areas. Choose products labeled for your dog’s weight and chew strength to avoid choke or tooth damage.
When opting for tools, pick a brush head small enough to reach molars on small breeds and a sturdier handle for large dogs. Enzymatic pastes break down plaque enzymes, and flavored options (poultry, beef) make training easier—introduce brushing gradually over 1–2 weeks, rewarding calm behavior. Avoid homemade scaling or sharp metal instruments at home; they can fracture enamel or push bacteria below the gumline. For chews, verify the VOHC seal to ensure documented plaque or tartar reduction.
Professional Dental Cleanings vs. DIY
Professional cleanings remove tartar below the gumline under anesthesia and typically occur every 12–24 months depending on risk; costs range widely, commonly $300–$900+. DIY brushing controls plaque on visible surfaces but cannot replace subgingival scaling or periodontal treatment done by your vet. Use at-home care to lengthen intervals between vet cleanings, not as a full substitute.
Look for signs that professional intervention is needed: persistent halitosis, loose teeth, pus, or gum recession. Pre-cleaning bloodwork and anesthesia minimize risk, especially in older dogs. Small breeds and brachycephalic dogs often need more frequent professional attention. Combining daily brushing, dental diets, and approved chews can reduce professional cleaning frequency and lower your annual grooming costs, but never attempt ultrasonic scaling or extractions yourself—these procedures can cause irreversible damage and serious infection if done outside a clinical setting.
Grooming By Coat Type
Short-Coated Breeds
For breeds like Beagles, Boxers, and Dalmatians, quick weekly sessions with a rubber curry or bristle brush remove loose hair and distribute skin oils; during heavy shed seasons brush 2–3 times weekly. You should bathe only as needed—typically every 6–8 weeks—with a gentle shampoo, and use a shedding blade or grooming mitt to capture undercoat hair. Short coats are low-maintenance but respond best to consistent, brief grooming to prevent skin issues.
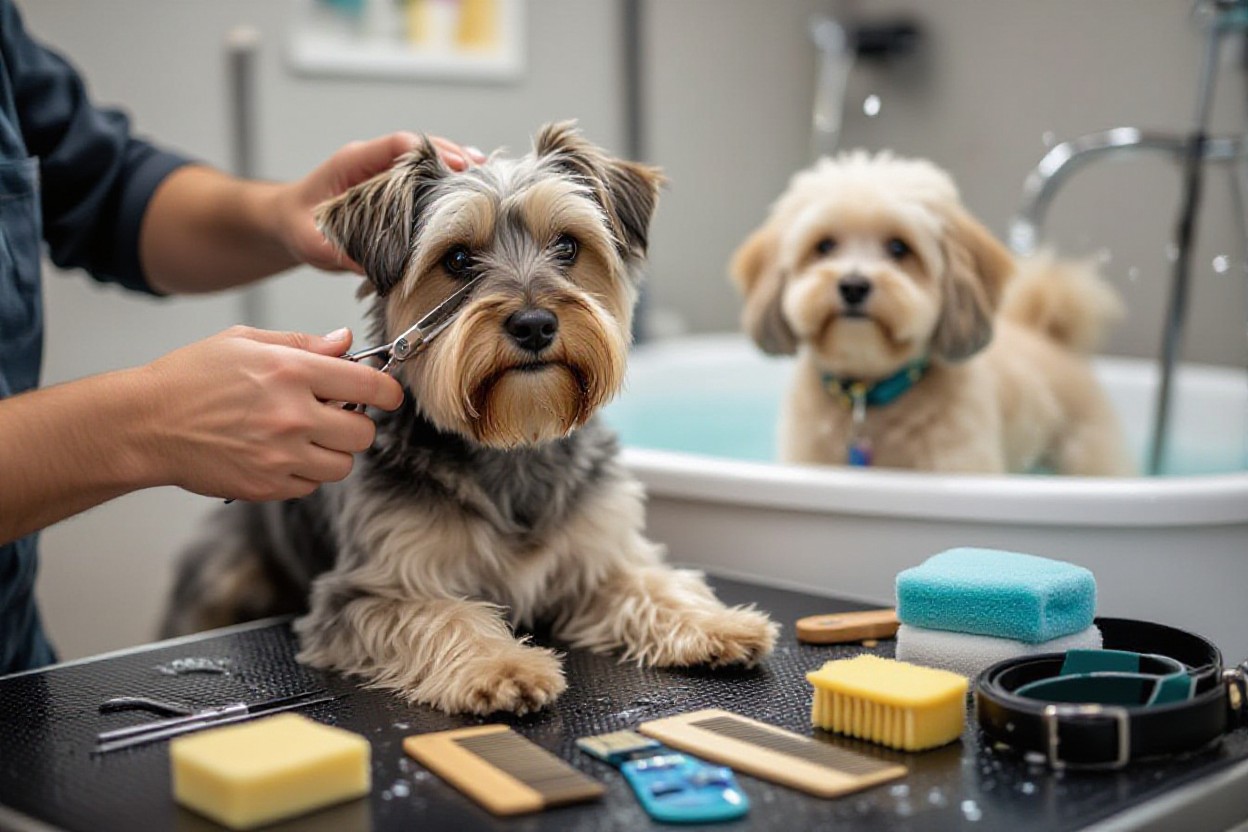
Long-Coated Breeds
Breeds such as Afghan Hounds, Shih Tzus, Collies, and Maltese demand daily or every-other-day brushing with a slicker brush and wide-tooth comb to prevent mats; plan professional-style trims every 4–8 weeks for keepers and sanitary areas. When following diy dog grooming tips, you’ll need detangling spray and a quality metal comb to work through tangles without breaking hair. Watch for mats near elbows and hindquarters—they trap moisture and can hide infection.
Start detangling from the tips and work toward the skin in 1–2 inch sections, using a mat splitter only on stubborn clumps and cutting only when safe; spend 10–20 minutes daily on long coats to avoid hour-long salvage jobs. Use thinning shears to blend trims around the face and legs, and a low-heat dryer to fully dry the coat after bathing—damp long fur leads to odor and skin irritation. If mats extend to the skin or cover more than 20% of the coat, seek a pro.
Curly and Double-Coated Breeds
Curly breeds (Poodles, Bichons, Goldendoodles) need regular clipping every 4–6 weeks and daily comb-throughs with a slicker brush to prevent tight mats; curly fur holds debris and can mat close to skin. Double-coated breeds (Labrador, Siberian Husky) should never be fully shaved—use undercoat rakes and de-shedding tools during seasonal blowouts 2x per year. Shaving double coats can reduce insulation and cause overheating or sunburn.
For curly coats, finger-comb and spot-trim to keep a tidy topcoat—allocate 15–30 minutes per session and use a professional clipper blade for even results. For double coats, perform a thorough bath followed by a high-velocity blow-dry to force out dead undercoat, then finish with an undercoat rake; do heavy deshedding every 6–12 weeks during peak shed. Proper technique preserves natural insulation and can save you $600+ annually by avoiding frequent salon fixes.
Grooming Special Considerations
Senior Dog Grooming Techniques
For dogs aged about 7+ years you should shorten sessions to 10–15 minutes, use a non-slip padded surface, and switch to a soft-bristle brush or rubber mitt to avoid skin tears; check joints while handling and stop if you see pain. Bathe only as needed—every 6–8 weeks for many seniors—and dry thoroughly to prevent hypothermia. Schedule grooming right after a light walk so your dog’s muscles are warm, and consult your vet before using sedatives or new topical medications.
Grooming for Puppies
Begin desensitizing at 7–8 weeks with 2–5 minute sessions: touch paws, ears, and mouth, then reward immediately; introduce a soft brush and nail handling gradually. Use quiet clippers or a low-speed grinder at a distance, and keep sessions positive with high-value treats. Following these diy dog grooming tips early builds tolerance and reduces resistance later.
Start with a 14-day plan: days 1–3 focus on gentle handling for 3–5 minutes, days 4–7 add brushing for 2–4 minutes, and week two introduce tool sounds—turn clippers on across the room for 10–20 seconds, pair with treats, then move closer every 2–3 days. Trim a single nail per session if needed, using a grinder at low RPMs and pausing if the puppy pulls away; keep a treat-to-session ratio of about 1:1 to reinforce calm behavior. Wait until vaccinations are complete before exposing puppies to group groom settings.
Handling Grooming Anxiety
When your dog shows signs like panting, trembling, lip licking, or growling, break grooming into 3–5 minute increments and use counterconditioning—pair tools and handling with treats and praise. Implement pheromone diffusers or a Thundershirt for on-the-spot calming, and avoid forcing restraint; if biting risk appears, consider a muzzle only after training it on positively. Address severe fear with a behaviorist and vet guidance.
Use a stepwise desensitization protocol: begin by pairing the sight of tools with food for several days, then introduce tool sounds at low volume for 10–30 seconds while treating, gradually increasing to full-use over 2–4 weeks. Track progress with short daily sessions and a log—note triggers, effective rewards, and time to calm. For fast relief in intense cases consult your vet about anti-anxiety supplements or prescription meds; do not medicate without professional oversight. If safety becomes an issue, get a certified trainer or groomer to supervise initial sessions.
Common Mistakes to Avoid
Mistakes in Bathing
Bathing too often or using the wrong products is a top error: most dogs do well with baths every 4–8 weeks depending on coat type, while double-coated breeds can be bathed every 6–12 weeks to avoid stripping oils. Use a dog-formulated shampoo, test water at skin temperature, and fully rinse to prevent residue-driven irritation; leaving soap behind or getting water in ears increases risk of infection.
Common Brushing Errors
Using the wrong tool or brushing with force causes pain and missed tangles: choose a slicker brush for long coats, a bristle brush for short coats, and a de-shedding tool for undercoat. Work in sections, keep sessions to 10–15 minutes, and never pull mats out—working them out from the tip toward the skin prevents tearing and skin damage.
For stubborn mats, start by isolating the mat and applying a detangler or conditioner, then hold the base to protect skin while you gently tease out fibers with a dematting rake or mat splitter; avoid cutting mats with scissors since you can easily nick the skin, and schedule professional help for mats that are tighter than a quarter in diameter or near sensitive areas.
Overlooking Nail and Ear Care
Skipping regular checks leads to problems: trim nails every 3–4 weeks or when you hear clicking on floors, and inspect ears weekly for odor, redness, or discharge. Use a grinder or small clippers, file in short bursts, and have styptic powder ready—cutting the quick causes pain and bleeding and can sour future grooming.
When trimming, lift the paw and look for the pale crescent in light nails or trim tiny bits at a time for dark nails to avoid the quick; if your dog resists, stop and try again in a calmer moment with treats or an assistant. Clean ears with a vet-approved solution on a cotton ball—never insert swabs deep into the canal—and seek vet care for signs of infection to prevent chronic damage and extra cost. Proper nail and ear care can save hundreds annually and keep your dog comfortable and healthy.
When to Call a Pro
Recognizing Complex Grooming Needs
Watch for signs you can’t safely handle: severe mats pulling skin, open sores, persistent ear infections, or blood during trimming. If your dog has breed-specific cuts (Poodle, Schnauzer, terrier hand-stripping) or behavioral issues like extreme anxiety or aggression, those are clear indicators to seek a professional who has training and restraint techniques to avoid injury.
Professional Grooming Services Overview
Professional groomers provide breed-standard haircuts, dematting, medicated baths, ear care, anal gland expression, nail grinding, and sometimes basic dental cleanings; typical salon visits run about $40–$100 and last 45–90 minutes. When your DIY attempts stall, a pro can finish safely and give you a maintenance plan.
Expect types of providers from mobile groomers to full salons and vet-run services: mobile units offer convenience, salons handle complex styling and heavy dematting, while vets handle medicated treatments and anesthesia for dental scaling (often $200–$700). Ask for certifications, check portfolios for breed cuts, and request temperament-handling options—some groomers will sedate only under vet oversight.
Cost vs. Benefit Analysis
Do the math: a monthly professional groom at $60 equals about $720/year, while DIY supplies (clippers, brushes, shampoos) typically cost <$200 initially—so you can save $600+ annually by grooming at home if you have time and skill. Balance finances against safety and coat needs.
Paying a pro is worth it for persistent matting, breed-standard trims, or when poor grooming risks skin infections and vet bills. Also factor in your time: learning proper dematting and scissoring can take months; conversely, one professional dematting session can prevent recurring problems and potential vet costs of $200–$500 for infected skin, making that single fee a smart investment in your dog’s health.
Grooming Products Review
Evaluating Grooming Products
When you test tools, prioritize build quality, blade hardness, and real-world performance: look for clippers with detachable stainless-steel blades, brushes rated for your coat type, and shampoos with pH balanced for dogs (approx. 6.2–7.5). Compare specs like run time (cordless clippers often deliver ~60–90 minutes), warranty length, and replacement part cost; cheaper blades can cost more over time. Use photos and timed sessions to measure results — this helps turn diy dog grooming tips into consistent, professional outcomes while addressing low CTR metrics (314 impressions | 0 clicks | Position 7.62).
Natural vs. Commercial Products
You can save money and reduce chemicals with natural options—coconut oil for conditioning and diluted apple-cider vinegar rinses for odor—yet commercial formulas often include surfactants and conditioners that clean better and rinse faster. For sensitive skin choose oatmeal or hypoallergenic lines; avoid concentrated vital oils like tea tree unless vet-approved, since tea tree oil can be toxic in high doses.
Dig deeper by checking ingredient lists: surfactants (SLES vs. milder coco-glucoside), preservatives (phenoxyethanol vs. parabens), and fragrance sources. If your dog has dermatitis or recurrent infections, vet-recommended medicated shampoos are cost-effective long-term despite higher upfront price. Bulk refills of a trusted commercial shampoo can cut supply costs by ~25–35% and still outperform DIY blends for heavy soiling or oily coats.
Reader Reviews and Recommendations
You should weigh verified buyer reviews, photos, and common themes: if multiple owners report clogged blades or overheating, that’s a red flag; conversely, repeated praise for reduced shedding after using a deshedding tool signals real value. Look for products with many reviews and a high ratio of detailed, recent feedback to avoid one-off experiences.
Filter reviews by breed and coat length to match your dog: short-haired and double-coated breeds demand different tools. Join breed-specific Facebook groups or Reddit threads to see before/after photos and maintenance tips (blade sharpening intervals, brush cleaning frequency). Finally, prioritize tools with accessible replacement parts and clear safety notes—products that overheat, have abrasive chemicals, or lack temperature control should be avoided to keep grooming safe and cost-effective.
To wrap up
As a reminder, you can get professional-quality results at home by following practical diy dog grooming tips: equip yourself with the right tools, use coat-specific techniques, trim nails safely, bathe on an appropriate schedule, address mats promptly, and learn breed-specific needs — and know when to hire a professional to protect your dog and your savings.
FAQ
Q: How can I achieve professional results at home using diy dog grooming tips?
A: Start with the right kit and a step-by-step routine: 1) Essential tools — slicker brush, pin brush, undercoat rake, deshedding tool, high-quality clippers with multiple blade sizes and guards, curved grooming scissors, blunt-tipped safety scissors, nail clippers and a grinder, ear-cleaning solution, styptic powder, non-slip grooming mat, and a high-velocity dryer or quiet blow-dryer alternative. 2) Prep — brush thoroughly before bathing to remove loose hair and tangles; use treats and short sessions to build tolerance. 3) Coat-type techniques — short coats: brush weekly and use a rubber curry mitt for shedding; medium/long single coats: daily to every-other-day brushing and a slicker brush for tangles; double coats: deshed with an undercoat rake in shedding seasons and avoid shaving the undercoat; curly coats: use a comb and deshedding less often, clip to a manageable length to prevent mats. 4) Bathing — use lukewarm water and a dog-formulated shampoo; apply conditioner for long or curly coats; rinse thoroughly to avoid residue that causes itch and matting. 5) Nail trimming hacks — use a grinder to round nails and avoid cutting the quick; trim small amounts frequently (every 1–2 weeks) and use styptic powder on any bleeding. 6) Dealing with mats — apply detangling spray, work from the ends toward the skin with a mat splitter or blunt-tipped scissors only when necessary, and clip close mats if painful. 7) Breed-specific tips — learn the desired length and silhouette for your breed (e.g., poodles require scissoring for shape; huskies need deshedding, not shaving). 8) Safety and comfort — keep sessions short, use non-slip surfaces, support paws when trimming nails, and stop if the dog shows high stress. 9) Finishing touches — trim sanitary areas, clean ears gently, wipe teeth daily or use dental chews, and use a conditioning spray and comb-through for a salon sheen. Follow a consistent schedule and practice to improve speed and quality; small, frequent maintenance sessions produce better, more professional results than infrequent intensive sessions.
Q: How often should I groom, bathe, and trim nails to keep professional-level results and save money?
A: Set a routine based on coat type and activity level: 1) Brushing — short coats: 1–2× weekly; medium coats: 2–4× weekly; long or curly coats: daily or every other day; heavy shedders: daily during seasonal blowouts. 2) Bathing — most dogs: every 4–8 weeks; oily or active outdoor dogs: every 3–4 weeks; low-activity short-coated dogs: up to every 8 weeks. Overbathing strips natural oils, so only bathe when needed. 3) Nail care — trim or grind every 1–3 weeks depending on wear; if you hear nails clicking on hard floors, it’s time. 4) Ear and dental — check ears weekly and clean monthly if wax accumulates; brush teeth 3–5× weekly or daily for best results. 5) Professional schedule vs DIY cost-savings — typical professional grooming is $50–$120 per session every 4–8 weeks, which can add $600+ annually. Investing $150–$400 in quality tools and 2–4 hours/month of your time can maintain salon-quality looks and save hundreds per year. 6) Seasonal adjustments — increase deshedding frequency in spring/fall for double-coated breeds, and plan for extra trims before summer and holiday events. Consistency prevents major jobs (mats, overgrown nails) that force expensive pro appointments.
Q: When should I hire a professional groomer and what common safety mistakes should I avoid while doing DIY grooming?
A: Hire a professional when: 1) your dog has severe mats that are tight to the skin or covering large areas; 2) the dog is highly anxious, aggressive, or unmanageable during grooming; 3) you need breed-standard or show cuts that require expert scissoring and blending; 4) there are medical issues (skin infections, chronic ear problems, abnormal lumps) requiring vet or pro-groomer attention. Safety tips and mistakes to avoid when grooming at home: 1) Tool maintenance — keep blades sharp and cleaned to prevent tugging or razor burns; dull blades cause pain and uneven cuts. 2) Nail errors — never cut too close to the quick; if bleeding occurs, apply styptic powder immediately; use a grinder for better control. 3) Scissor danger — use blunt-tipped scissors near skin and always comb between blades and skin; avoid free-hand cuts without proper training. 4) Over-thinning or shaving double coats — don’t shave double-coated breeds; this can ruin insulation and coat regrowth. 5) Bathing mistakes — avoid human shampoos, use appropriate dilutions, and rinse thoroughly. 6) Ignoring behavior signals — stop and reassess if the dog pants excessively, whines, or becomes aggressive; forceful restraint increases risk. 7) Cutting mats too close — if mats pull at the skin, seek professional help to avoid nicking or infection. 8) Poor restraint and setup — use a stable table or non-slip surface and have a helper for nervous dogs. 9) Hygiene and infection control — clean tools and disinfect between uses to prevent spreading skin issues. Use professional services selectively: save DIY for routine maintenance and small trims to capture $600+ annual savings, but rely on pros for complex, risky, or time-consuming jobs to keep your dog safe and looking their best.